This tutorial will show you how to add custom buttons to the FCChat Toolbar. With these buttons, you can add a like box, a twitter feed, or a search engine to the toolbar. You may also create buttons that add specialized functionality to your site, like a recent topics button, a website store button, etc.
There are 3 types of buttons that you can add:
1) Buttons that open a dialog box in the toolbar.
2) Buttons that open another page on your site.
3) Buttons that open a popup window.
Each button you add consists of 2 main elements – an icon, and some text. Both the icon and text are optional. You are responsible for providing the content page that the buttons link to.
We will begin by showing you how the “Like button” and the “Search” button that appear on the home page of this site (www.fastcatsoftware.com) were created. Both of these buttons are of the type 1 variety (above). We will then show you how to create type 2 and 3 buttons.
The first step in creating a custom button is to add the button code to the custom_buttons field in the FCChat Configuration. If you are using WordPress or Joomla, you will place your button code in the textarea provided on the configuration page. For all other installations, you will be editing the FCChat/config/config.js file directly. In this case, you will place your code between the braces of the
custom-buttons:{

},
field.
After creating the button code, you will then add the button to the toolbar_items field, also found in the FCChat Configuration. We will cover the syntax required to add the button to the toolbar_items list later, but first, lets take a look at generating the button code.
Google Search Button
Here is the button code for the Google search button that appears on our home page:
googlesearch:{
	menu_item:{
		width:85,
		icon:"http://www.fastcatsoftware.com/FCChat/current_skin/wp_search.png",
		text:"Search"
	},
	dialog_box:{
		width:450,
		height:350,
		title:"Search Fastcatsoftware",
		iframe_src:"http://www.fastcatsoftware.com/search.html"
	}
}
You would place this code in the custom_buttons field mentioned above. The syntax for the button code is Javascript object literal notation. I mention this because the syntax must be correct in order for the button to be displayed properly. Incorrect syntax may generate an error which will prevent the toolbar from showing up. This is especially true with regard to the placement of commas. Notice that each item in a list has a comma after it, except for the last one. Failure to place commas in the appropriate places can cause the toolbar to crash on some browsers. You must take the same care in placing quotation marks around values which require them.
That being said, let’s get back to what the code above does. Notice, first of all, that the code begins with word googlesearch. This is the name of the button, and you can basically name it anything you like. We could have called it goooglebutton or thegooglethingy, etc. (One caveat: letters, numbers, and underscores are allowed in the button name, but no spaces.)
The other fields in the button code define the appearance and behavior of the button. Some of these fields are required and some are optional. Let’s review what each of these fields accomplishes.
The menu_item section
Each button you create must have a menu_item section. The menu_item section provides FCChat with the information it needs to render the button in the toolbar. Within the menu_item section you may have the following fields:
width (required) The width, in pixels, of the button.
icon (optional) An image for your button. Enter the full URL to the button image file. It will be rendered as a 16X16 pixel image by default (this can be changed). This field is optional, and you may remove it from your button code if you wish.
text (optional) The text for your button. This field is optional, and you may remove it from your button code if you wish.
Here are some additional fields which you may want to add to the menu_item section.
icon_css (optional) A list of CSS properties (ie icon_css:”border:1px solid red;top:5px;left:20px;”) that can be used to alter the location, size, and display properties of the icon.
text_css (optional) A list of CSS properties (ie text_css:”font-family:arial;color:blue;”) that can be used to alter the location, size, display properties of the text.
The dialog_box section
Since the googlesearch button is a type 1 button (it opens a toolbar dialog box), it must contain a dialog_box section. You will omit the dialog_box section when coding type 2 and 3 buttons. The dialog_box section contains the following fields:
width (required) The width in pixels of the dialog box.
height (required) The height in pixels of the dialog box.
title (required) The title of the dialog box.
iframe_src (required) The URL of the page that should be rendered inside the dialog box. For our googlesearch button, we have set up an html page on our site with the Google Site Search function embedded in it (http://www.fastcatsoftware.com/search.html). We use the iframe_src parameter to link that page to our button’s dialog box.
Adding the like button
Now that we have seen the code for the Google search button, lets go ahead and add a second button – the like button – to the custom_buttons field.
The custom_buttons field now looks like this:
     googlesearch:{
	menu_item:{
		width:85,
		icon:"http://www.fastcatsoftware.com/FCChat/current_skin/wp_search.png",
		text:"Search"
	},
	dialog_box:{
		width:450,
		height:350,
		title:"Search Fastcatsoftware",
		iframe_src:"http://www.fastcatsoftware.com/search.html"
	}
    },
    like:{
	menu_item:{
		width:65,
		icon:"http://www.fastcatsoftware.com/FCChat/current_skin/facebook.png",
		text:"Like",
	},
	dialog_box:{
		width:320,
		height:330,
		title:"Our Friends on Facebook",
		iframe_src:"http://www.facebook.com/plugins/likebox.php?href=http%3A%2F%2Fwww.facebook.com%2Ffastcatsolutions&width=300&height=290&colorscheme=light&show_faces=true&border_color&stream=true&header=true&appId=204858386287047"
	}
    }
The like button contains pretty much the same fields as the googlesearch button. Notice that the iframe_src field now points to the URL for like box plugin, and that the width and height have been adjusted to conform to the dimensions of the like box.
Notice also, in the code above, that, at the very end of the googlesearch button code, there is now a comma, but at the end of the like button code (because it is last in the list) there is no comma. Every button you add must end in a comma except for the last one. I cannot stress this enough, because if you don’t put the commas in the right places, you will have major problems.
Adding the buttons to the toolbar
Ok, we are done creating the button code for our two buttons, but they are not going to show up in the toolbar yet. This is because we have not added them to the toolbar_items list. Let’s do that now.
The toolbar_items field is in the FCChat Configuration, right next to the custom_buttons field we have just finished editing. To add the buttons, you will insert custom_buttons:googlesearch and custom_buttons:like into the list, like this:
Before:
[“fullpage:logo”,”friendscenter”,”social_media:social_media”]
After:
[“fullpage:logo”,”custom_buttons:like”,”custom_buttons:googlesearch”,”friendscenter”,”social_media:social_media”]
You can place the buttons anywhere in the list. That is the order they will appear in the toolbar. The syntax for inserting buttons is always custom_buttons: followed by the name of the button, which is set when you create the button code.
Here is what the two buttons now look like when viewing the toolbar:

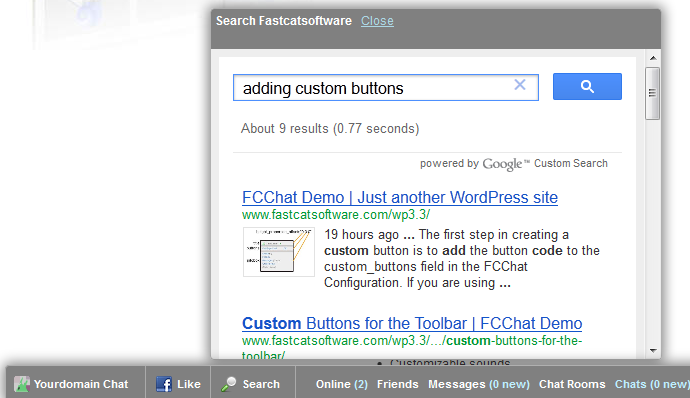
Each button opens its own dialog box. Here is what you may see after clicking the search button:
Creating type 2 and type 3 buttons
Now we will show you how to create buttons that link to another page or open a pop-up window.
Let’s start by creating a Main Page button. Here is the button code:
main:{
	menu_item:{
		width:80,
		text:"Main Page",
		href:"http://www.fastcatsoftware.com",
		newtab:true
	}
}
This button opens the main page of our site (in this case www.fastcatsoftware.com). We have omitted the icon field from this button, so only a text link will be displayed.
newtab (which is an optional field) is set to true, so that when you click on the button, the link will open in a different tab. Without the newtab parameter, the link would open on the same page.
href points to the URL that the button links to.
Let’s say that you want a button that opens up a pop-up window. Maybe a login button, or something.
Here is the code for that:
login:{
	menu_item:{
		width:75,
		text:"Sign in",
		href:"Javascript:void(0)",
		onclick:"window.open ('http:/MYLOGINURL','mywindow','menubar=1,resizable=1,top=300,left=300,width=350,height=250');"
	}
}
The onclick parameter holds the script to be executed when the button is clicked, in this case we are opening a pop-up.
The href parameter is set to Javascript:void(0) to suppress the buttons default behavior when clicked.
{“topic”:”Custom buttons for the toolbar”}